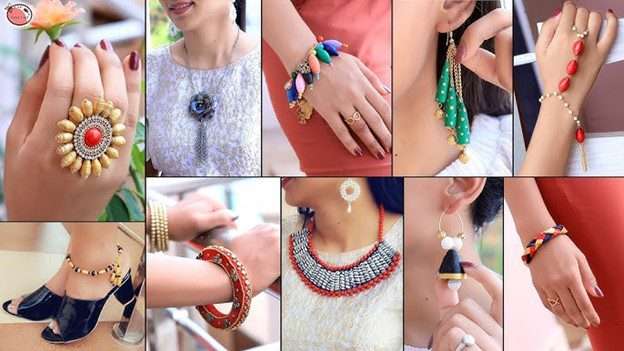
Paper jewellery has become a trendy and eco-friendly way to accessorise, and what’s even better is that you can create unique pieces using simple materials like A4 sheet paper. Whether you’re a beginner or an experienced crafter, making your own paper jewellery is a fun and inexpensive activity that allows you to express your creativity. In this step-by-step guide, you’ll explore how to design and craft stunning paper jewellery using readily available A4 sheet paper from your favourite.
Step 1: Gather Your Materials
Before you start your paper jewellery-making journey, gather all the necessary materials. Here’s what you’ll need:
- A4 sheets of paperin various colours and patterns
- Scissors
- Glue or adhesive
- Ruler
- Pencil
- Jewellery findings (such as earring hooks, jump rings, and clasps)
- Optional: embellishments like beads, sequins, or rhinestones
Step 2: Choose Your Design
Let your creativity flow as you decide on the design of your paper jewellery. Will you opt for delicate earrings, a statement necklace, or perhaps a charming bracelet? Sketch out your ideas on paper to visualise the final product before diving in.
Step 3: Cut Paper
Using scissors, carefully cut the A4 sheets of paper into the desired width and height strips for your jewellery pieces. You can experiment with different dimension strips. Precision is key here, so take your time to ensure clean and neat cuts.
Step 4: Roll and Shape Quilling Strips
Using your quilling tool, roll the paper strips tightly to create basic shapes like circles, teardrops, or coils. Experiment with different sizes and techniques to achieve various effects. You can also shape the coils into more intricate designs by pinching or bending them while they’re still soft.
Step 5: Assemble Your Jewellery
Once you’re satisfied with the individual components of your paper jewellery, it’s time to assemble them into the final pieces. Use glue or adhesive to secure the various elements together, ensuring they are firmly attached. Arrange the quilled elements in patterns or designs that complement your overall aesthetic. You can layer different shapes, stack them, or intertwine them to create visually stunning effects.
Step 6: Attach jewellery Findings
To transform your paper creations into wearable jewellery, you’ll need to attach jewellery findings such as earring hooks, jump rings, and clasps. Carefully affix these components to your paper pieces using glue or by making small holes to loop them through. Take your time with this step to ensure that your jewellery is both secure and comfortable to wear.
Step 7: Add Embellishments (Optional)
For an extra touch of sparkle and personality, consider embellishing your paper jewellery with beads, sequins, or rhinestones. These small accents can elevate your design and make it truly stand out. Experiment with different placements and combinations until you achieve the desired look.
Step 8: Seal and Protect
To prolong the life of your paper jewellery and protect it from wear and tear, consider applying a sealant or clear varnish. This will help to reinforce the paper and make it more durable, ensuring that your creations withstand everyday use.
Step 9: Showcase Your Creations
Once your paper jewellery is complete, proudly showcase your creations to the world! Whether you wear them yourself or gift them to friends and family, your handmade accessories are sure to spark admiration and conversation wherever you go.
Step 10: Experiment and Explore
The beauty of making your own paper jewellery lies in the endless possibilities for creativity and experimentation. Don’t be afraid to try new techniques, explore different designs, and push the boundaries of what’s possible with paper. With each project, you’ll hone your skills and uncover new inspiration for future creations.
Designing and making your own paper jewellery is a rewarding and enjoyable craft that allows you to express your unique style and creativity. Armed with just A4 sheets of paper and a few basic tools, you can create stunning accessories that are as stylish as they are sustainable. Follow these step-by-step instructions, unleash your imagination, and let your paper jewellery journey begin!
It’s worth noting that using old paper from around your home for such projects not only adds a personal touch but also contributes to environmental sustainability by repurposing materials that might otherwise end up in landfills. Plus, old paper can be easily painted on, providing a versatile canvas for your designs.
When purchasing paper for your projects, consider opting for sustainable options from manufacturers like JK Paper. Choosing paper from responsible sources helps support environmentally friendly practices and reduces the impact on our planet’s forests.

As the editor of the blog, She curate insightful content that sparks curiosity and fosters learning. With a passion for storytelling and a keen eye for detail, she strive to bring diverse perspectives and engaging narratives to readers, ensuring every piece informs, inspires, and enriches.


